
Typical RV Water System Diagram (How Do Water Systems Work?)
When it comes to comparing your traditional home and your RV’s water systems, you may be surprised they are almost identical. The one big difference would be that you store your freshwater in your RV holding tank while the water is pumped into your home.
You may find that the RV water systems are all basically the same. The minor differences will be due to floor plans and chassis designs. The water will come from either the city or your freshwater tank and both may not be on the same side of the trailer or RV.
To learn more about this topic, just continue to read our article. It has the diagrams and information you want to know about so you can fix any minor RV plumbing issue that happens in your RV or trailer. There should be some differences between the trailer and motorized RVs.
How Does an RV Water System Work?
The water systems in most RVs and trailers are very simple. They simply provide the incoming or stored water with a clear path to its intended destinations.
If you are using your freshwater tank, then a water pump moves the water to your sink, shower, toilet, or water heater. If you have an outside shower, it will be pumped to that outlet as well.
The water pump works on electricity so you need to make sure your batteries are powered, you have good fuses and there are no possibilities of a short taking place. Or you can get power from the campground or your generator to operate the pump.
The city water inlet and pipes seem to bypass the pump in the water plumbing diagrams we have looked at. They do not work together so you can save some wear and tear on your pump when you connect to city water.
The reason you do not use the water pump in your RV when you are connected to city water (or campground water systems) is that they are already pressurized systems and do not need help from the water pump.
Typical RV Water System Diagram
The following diagram shows you the water supply system for a motorized RV:

The following diagram looks to be one for a trailer.

They can be quite similar as the needs of both the RV and trailer are very similar. The locations of all the components though will depend on the chassis design as well as the floor plan for the trailer or RV.
Plus, if you are driving a smaller RV or towing a small trailer, there will be a few differences in design and some key components will be missing. Often the smaller trailers and RVs will not have a black water tank, shower, and so on.
When you are buying smaller, make sure to check this system out to make sure you can live with a few minor inconveniences.
RV Fresh Water System Diagram
The following diagram does not include the black & gray water tanks nor doe sit have the toilet in the diagram as well. It is a very simple system to repair as well as work on.
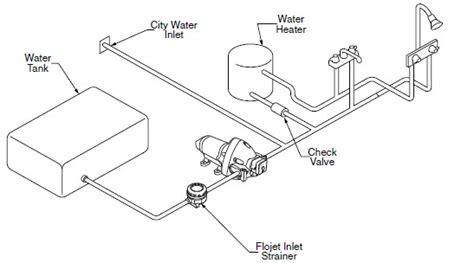
The drawbacks to the RV’s water system are the water pump and the check valve. Those two components may be the ones that break down the most. But getting them repaired can be costly due to their design, location, and what is wrong.
Rarely should you have any problems with the fresh water tank or the faucets. While used a lot, they do not have a lot of working parts that can fail. But it can be frustrating if you get a leak in your fresh water tank.
That repair is not always easy or inexpensive to do.
Forest River RV Water System Diagram
You will not find too many differences between the Forest River water system diagram and other RV makers’ diagrams. There is only so much space and room to put the systems in, that they will be very similar to each other.

This may not fit all models of RVs and trailers Forest River makes. There will be slight differences between all of the models including those made in the same model series and years. That is if the company treats its water system diagrams like they do their wiring diagrams.
To show you the reason why there is so much diversity in these diagrams, take a look at the following floor plan:

Notice that the sink, in this floor plan, is on an island placed in the middle of the RV. The bathroom is not that far away which is good. But this is just an example of the difficulties there are in getting a one size fits all water system diagram.
Where Is The Water Pump Switch?
This switch is not as elusive as the electric water heater switch. It should be located on the same control panel as your water heater switch or switches. Or it could be located on the panel monitoring your holding tank levels.
Once on, it should glow letting you know that it is on and may need to be turned off. If you are going to winterize your RV, it is a good idea to disconnect the water heater and the water pump switches.
This task helps protect the appliances from being turned on accidentally. This happened to one owner who sent someone inside his RV to look for an item. The person needing a light hit a switch but it wasn’t the light switch. Just take precautions to avoid accidents. Read more about the RV water pump switch location.
Some Additional Words
The water system in an RV and trailer is smaller than in a traditional home. Plus, they are probably easier to work on because of the pipes’ locations. The key to using your water system is to make sure you are either connected to city water or your fresh water tank is full.
That is the only way to avoid problems with all the components hooked to this system.
