Jayco and Forest River RV Plumbing Diagram Schematic (Guide)
With some minor adaptions, the plumbing in an RV or trailer is fairly close to what you would expect in a traditional home. There are pipes everywhere that carry both hot, cold, and used water to their respective destinations. The key is not to waste water.
The plumbing design is basic, and straight forward. You have your source, city water, or the fresh water tank, and then all the water lines are laid out that will bring the water to where you want it in the fastest way possible. Most RV brands have it set up this way.
To learn more about this topic, just continue to read our article. It explores the topic so you know how your plumbing works. Some owners have made adaptions to their plumbing systems once they understood how it works.
What Type Of Plumbing do RVs Use?

The best way to answer this question is to say that the RV or trailer is plumbed in such a way, that normal household and personal activities can be carried out like you were in a traditional home.
The only difference is that you have to handle the water hook-up, the fresh water tank, and disposing of any waste. An RV or trailer is not usually connected to a sewer or septic tank.
All the pipes are laid out in the best way, knock on wood, possible to facilitate that environment. The drains do not intersect with the water lines and you can flush your toilet without worry as you know that the path to the black water tank is not a long journey.
The plumbing pipes and connections may be made from Pex material, metal, or ABS plastic. It would all depend on the RV maker.
How Does Plumbing Work in a Travel Trailer?

This plumbing is not much different than what we described in the previous section. The plumbing will depend a lot on the floor plan, where the faucets, sinks, showers, and toilets are located.
The plumbing will work like any coach plumbing set up once you fill the fresh water tank or attach the city water line. The trick will be not wasting the cold water while you wait for the hot water to arrive at the back sink.
Some owners have come up with some unique and innovative adaptions that help them preserve water when they want to shave or clean up. Also, the plumbing construction materials will be similar to the materials used in a coach.
All RV makers look for the cheapest option that will save them money while driving profits. One other thing about RV or trailer plumbing is that the designs are very similar as will all the diagrams that can be provided.
The only differences will be influenced by the size of the tanks, the floor plans and where the bathrooms are, etc.
RV Plumbing Schematic

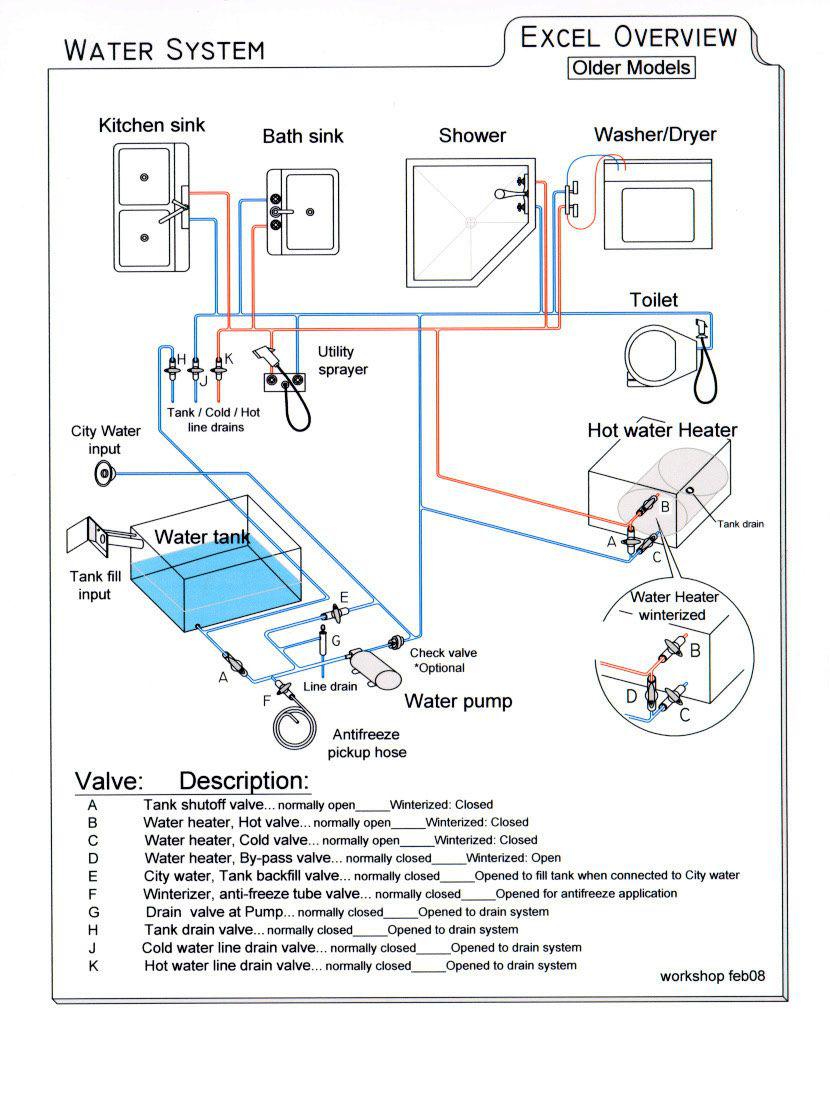
This is a very simplified drawing that gives you a basic look at what is involved in RV plumbing. It is not an actual diagram because the diagrams will change depending on the RV maker, the floor plan, and so on.
You will notice that this plumbing diagram shows the bypass and where it will be located. Not all RVs, etc., will have this feature but you may be able to add one at a later date.
You should also notice that this diagram shows where to add your RV anti-freeze. It is okay if some of the anti-freeze makes it into the freshwater tank. That tank may not be totally empty of water when you flush it out.
Travel Trailer RV Plumbing Diagram
As you can see, this diagram is a little bit more complicated than the previous one. All diagrams, as we have already said, will be different due to the different designs each RV or trailer model comes in.
Also, notice that the outdoor shower is hooked directly to the black water tank in this situation
One similarity between the two is that the freshwater tank is placed well away from the Gray and black water tanks. You do not want to have any cross-contamination if you happen to make a mistake and hook up the wrong hose.
Why the RV makers do this design change is probably because it is cheaper to hook it directly to the black water tank and that tank is closest to the outdoor shower.
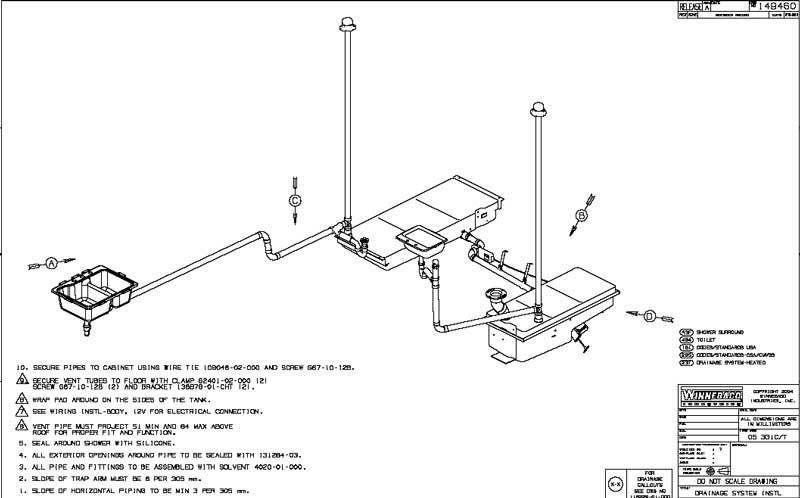
RV Sink Plumbing Diagram

A simple drawing to give you an idea of how your sinks hook up to the gray water tank. In this situation, it seems that the bathroom sink is plumbed directly into the black water tank.
If you look closely, you will see that the gray water tank empties into the black water holding tank to help flush it out. Vents are needed to help protect your RV or trailer from any methane gas that may arise from the waste water.
Of course, and we need to mention this if you have more than one shower and bathroom sink, the diagram would be more elaborate than this one. If you need a diagram that fits your RV or trailer, contact your dealer or brand head office directly and ask them for one.
Hot Water Plumbing Diagram

It is hard to just show the hot water pipes and where they run. But most diagrams highlight the hot water pipes with orange. That way you can see them more clearly and trace where they go.
Keep in mind that there will be a cold water line connecting to the water heater. The reason should be obvious as you need to have cold water before you can have hot water.
You can save on RV anti-freeze if you install a bypass line instead of filling up your water heater with the anti-freeze. A good plumber can install one with the right valve in no time.
RV Toilet Plumbing Diagram

Another simplistic diagram but it gives you an idea of how the plumbing looks for your toilet. Those with 2 toilets should expect more pipes underneath their trailers or RVs.
Notice how close the toilet is to the black water tank. We cannot guarantee this will be the case for every toilet in every RV, etc., but it will be close. The shower and sink, in this example, hook up to the gray water tank which does not seem to empty into the black water one.
But diagrams are not always drawn to actual dimensions and locations. Again, you can always search the internet for a specific diagram for your model of RV or trailer.
Jayco Plumbing Diagram

This is labeled as a Jayco plumbing diagram and it may be just that. We have run into different websites that mislabel their diagrams before.. as you can see, the set up is similar to other RVs and trailers.
That is to be expected as there are very few design alternatives you can use for these homes away from home. That is the thing as plumbing is a very limited field. You only have so many places to put the sinks, etc., as well as the holding tanks.
Plus, there are only a few places to run those pipes. Do not expect one RB brand to have a unique way to lay out its plumbing as all brands are in the same boat.
Forest River RV Plumbing Diagram

When you compare this diagram with the ones already in this article or the ones that you find in your own searches, you will see what we mean. RVs and trailers are not that large so there are only a few locations to put everything
You will find a lot of similarities between all RV brands' plumbing designs. Just like you would with traditional home plumbing. Everything is going to find the easiest path for the water and waste to flow properly and safely.
The RV Plumbing Components

Just like a traditional home, you will find that there are many parts to the RV plumbing system. Here are those components that you will have to take care of once you buy an RV or trailer:
1. Water pump- usually powered by 12-volt electricity
2. Fittings- showers, faucets, taps, and so on
3. Facilities- toilets, drains, water heater,
4. Tanks- fresh, gray, and black water holding tanks
5. Pipes- usually made from Pex, copper, or plastic depending on the RV brand’s decision.
Some Final Words
In seeing these diagrams, one thing should stand out. That these systems are all straight forward and not hard to fix. What makes them difficult is where the RV makers place key connectors, valves, and pipes.
There is only so much room to work with and RV makers have to make the most of that room so there is space left over for wires and other needed RV components.
If you need a diagram for your specific RV, contact your dealer to get one.

