")
When and How to Grease RV Wheel Bearings (Helpful Guide)
Preventive maintenance saves you money. It also saves you a lot of time when you need to be in your RV and trucking down the road. Plus, preventive maintenance on the little things like wheel bearings can save you both.
As they say, it is the little things that count and caring for the little wheel bearings can make the difference between a good and bad vacation.
When and how to grease RV wheel bearings? An RV wheel bearing maintenance should be done roughly every 10,000 miles. Some trailers can go 12,000 miles before needing some maintenance on their wheel bearings. After removing the wheel, dust cap and cotter, pin just remove the old grease and replace it with the new.
To learn all the details on how to grease your wheel bearings just continue to read our article. Its filled with the information you need to know to save you time and money. You will also learn how easy it is to do yourself.
RV Wheel Bearings 101
How to Check RV Wheel Bearings
First off, re-packable bearings are usually found in the non-driving wheels on your vehicle. This means the front wheels if you have a rear drive RV. Secondly, you do not have to remove the tires to check them. Just follow these simple steps:
- Jack up your RV under the wheels you need to check
- Grab the wheel and rock it. If there is no play, then the bearings are still good. If there is a lot of side to side movement, then you need to repair or replace the bearing
- Next, put your RV in neutral
- Then grab the wheel and give it a spin
- As it spins, listen for any strange noises
- Use your hands as the wheel spins to feel if there is any roughness as the wheel goes around.
- If there is noise or roughness to the spin, then you probably need to repair or replace the wheel bearings
How to Tell if Your Wheel Bearings are Bad
Without removing the tire, you need to elevate the non-driving wheels far enough off the ground to test the wheel bearings. Once you have the wheels high enough, first grab the wheels with two hands and try to rock the wheel.
If the wheel moves or feels loose then there is something wrong with the bearing. The next step to take is to put your RV in neutral and give the wheel a firm but steady spin. If you hear noise or feel a little roughness in the spin, then you have a problem with the wheel bearing.
In each case you have a choice. You can repack the wheel bearings or replace them with better ones. There is a third way to test to see if your wheel bearings are bad. And you do not have to get your hands dirty.
As you drive and you start hearing a noise like a bearing is going bad, to find which wheel bearing it is, you just have to turn the steering wheel. If you turn to the right, and the noises goes quieter, then it might be the wheel bearing on the left wheel.
If you turn to the left and the noise subsides, then it may possibly be the right wheel bearing that is going bad. The only thing you have to be careful about in this instance is that a wheel bearing noise sounds a lot like the noise a bad brake pad makes.
Cost to Repack RV Wheel Bearings
If you take your RV to a qualified RV mechanic, the cost could run you as much as $200 for all wheels. The job may take the mechanic around 2 hours to fix 4 wheels. In calculating the cost, you need to know the shop time rate plus the labor cost.
If you want to do it yourself, there are kits available. These kits run about $15 per wheel and the price will depend on your location and the store you bought it at. A tube of grease runs approx. $6 and it shouldn’t take a beginner more than a couple of hours to get the job done.
You may want to do it yourself, so you know the job was done right the first time.
How Often Should RV Wheel Bearings be Repacked
Depending on the size of your RV each wheel bearing can go about 12,000 miles before needing repacking. You can check them sooner than that but not too much later. For RV trailers, their wheel bearings should be checked every 10,000 miles.
Smaller wheels do not have the endurance larger RV wheels have. When you have small wheels, you should check them every 2,000 miles and repack them if needed. Driving too far is not good and can lead to the wheel bearings breaking down and needing replacement.
That will cost you a lot more money and a little more frustration if you are not near a city.
How to Repack RV Wheel Bearings
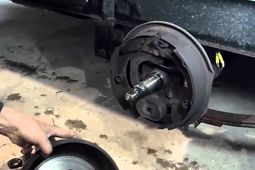
Here is how to repack your RV wheel bearings when you have drum brakes:
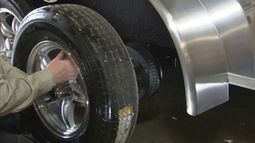
- First, jack up your RV and remove the tire
- Next, remove the dust cap and cotter pin
- Then remove the retaining nut, washer and outer bearing
- After that slide the hub assembly off and knock the inner bearing out of the hub
- Clean all the old grease out and then clean the brake shoes, backing plate, drum and so on.
- Now, lightly grease the bearing races and then pack grease into the bearings
- Replace the inner bearing into the hub and put on a new grease seal
- Place a thin coat of grease on the seal and slide the assembly back over the axle. Be careful not to damage the seal
- Place a thin coat of grease on the seal and slide the assembly back over the axle. Be careful not to damage the seal
- Next, slide the outer bearing over the axle, then the washer and then the retaining nut. Tighten the nut as you rotate the drum
- Install a new cotter pin and replace the dust cap
- Then just repeat this procedure on the rest of your RV’s wheels
How Often Should RV Wheel Bearings be Greased
The good aspect about bearings and their parts is that they are made to last along time. But that durability does not mean they can go forever without repacking. On larger RV wheels, it is recommended that the wheel bearings be repacked once a year.
Or if you travel a lot, then you should repack them every 12,000 miles. The thing about bearings is that they like to be used. The longer the sit the worse they get. This means that if your RV is stored for long periods of time you should check them before you hit the road again.
Larger trailer owners should have their bearings repacked once a year or if used a lot, then every 10,000 miles. Those RV owners with small trailer wheels should repack their bearings every 2,000 miles.
How to Grease RV Wheel Bearings
The process to grease your RV wheel bearings is quite simple. It doesn’t take an experienced mechanic to get the job done. All you have to do is follow the following simple steps.
- First, jack up the wheel you are going to work on and make the RV safe
- Second, remove the rubber plug on the axle end
- Third, place the nozzle of the grease gun on the grease jerk
- Pump the grease gun until the grease appears. Using a different color of grease each time helps you see where the new grease begins and the old grease ends
- Replace the plug and gap and then move on to the next wheel and repeat the process.
Best Grease for RV Wheel Bearings
The best grease depends on the type of RV vehicle or trailer you are using. For small boat trailers a good marine wheel bearing grease will handle the job. This type of grease is made for high speeds and for moisture or water.
When it comes to larger RV trailers or vehicles just about any high temperature grease will handle the task. Although not all wheel bearing grease will work with different brands of RVs.
You should check your owner’s manual to see what recommendations the manufacturer makes concerning wheel bearing grease. The key to repacking the bearings and using the new grease is to make sure you remove all of the old grease from the bearings first.
To make sure you are getting the right grease, you should check the high drop point spec on the grease container. The minimum needed is 450 rating.
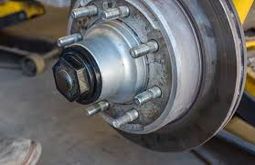
How to Replace RV Wheel Bearings
When you start to repack your wheel bearings, before you add the new grease and after you have cleaned out the old grease inspect your old bearings. You are looking for pits, scratches, excessive wear, dents in the roller cage, and nicks in the roller.
If you find these imperfections, then you need to replace your bearings. To do this you all you have to do is disassemble the hub and remove the seals, races and inner bearings and so on. Clean the hub and get it ready for the new parts.
- Then place the inner bearing into the hub and put the new seal on, making sure you lightly grease the spindle. Tap the seal in a circular fashion until the seal is flush
- Slide the hub into place and add the outer bearing and its seal. Rock the hub back and forth gently until the bearing sits properly in the race
- Place the washer on the spindle and slide it into place. Using a wrench turn the nut until it is firm against the hub.
- Add your new cotter pin and replace the cap
Always use a new cotter pin whether you repack or replace the bearings
How to Tell What Wheel Bearings I Need
This is easier than you would expect. RV manufacturers have place serial numbers on its wheel bearing parts to make replacing the bearings a lot easier. To find these numbers you just need to remove the hub and look on the inner and outer bearings to find them.
Once you get these numbers finding your replacement should be simple. Two things you need to know. First, the axle determines the bearing size and the bearings need to be rated for the weight load.
Second, there are types of bearings. One is known as the Japanese style and it is designed for long hauls. The other is known as the Chinese and these are made for short tips
RV Wheel Bearing Adjustment
When trying to make an adjustment to your RV wheel bearings think about Goldilocks and her story. If you tighten the bearings so that there is resistance, then you have made it too tight.
If you back off too far and have a little play, then it is too loose. In between those two points will be just right. In other words, if you can spin the wheel easily when jacked up and there is no play, then you have the right adjustment.
Then tapered wheel bearings need to be tightened between .001 and .005 end play and you should have a little wiggle room but not a lot when you have the right adjustment.
RV Wheel Bearing Dust Covers
These are held into place by a small flange and they may not be that sturdy. If they get damaged, they can fall off at any time and you might not notice until you do your regular bearing maintenance check.
A missing duct cover can allow all sorts of problems to invade your bearings, hub and brakes. Repairs to these unfortunate instances can run high. You should make sure your dust covers are securely on every time you move your RV.
If you find one of yours missing, do a quick check to make sure there is no damage to the interior of your hub or bearings. Replacement dust covers can be found anywhere, and they are not that expensive.
Some Final Comments
Taking care of the little items on your RV is taking care of you and your pocketbook. When you do proper preventive maintenance to your wheel bearings, they should last you a long time and help you avoid expensive repair bills.
Also, repacking or replacing your wheel bearings doesn’t take along time. The task is not difficult to do and if you do not want a qualified mechanic to do it and charge a lot of money, then you can find good repair kits at an affordable price.
When you check your bearings remember to check your dust caps. If this little item falls off, it may be the source of your next high repair bill.
