
Fleetwood RV Battery Wiring: How Should RV Batteries Be Wired?
When it comes to RV life making sure you have power is essential. That means that you do need to know how to wire your RV batteries correctly. It is not hard and basic electronics but you would be surprised at how many people do not know how to do this.
The first step in this process is to use the right wire. It is recommended that you use 6 to 4 AWG wire with the latter gauge being the best of the two. Once you get the right wire, then you can take the next steps to wire those batteries.
To learn more about this topic and how to do the wiring, just continue to read our article. It has the information you want to know about so you can do this task yourself. But if you do not like to work with electricity call in a professional to do the work for you.
How Should RV Batteries Be Wired?

If you are using more than one battery in your RV or trailer, then the best method is wiring them in parallel. This method helps extend the batteries' lives and it helps them work better.
Next up would be the external post option. This is where you have more than one battery in your battery compartment and you wire the positive terminals to the exterior positive post. Then you run a wire from the external post to your RV power. Then do the same with the negative side.
The drawback to this top system is that you need a lot of space in your battery compartment to install those two external posts. This works well if you can do it.
There is a wrong way to connect multiple batteries and it is connecting them positive to positive all the way down the line and negative to negative in the same way. This option also has you attaching the RV power wires to the lead battery.
What this does is draw more power from the lead battery and the least amount of power from the last one in the line. This only works with a 2-battery setup where you connect the positive of both batteries together and then the RV power wire to the positive of the lead battery.
The negatives are set up in the same format
Fleetwood RV Battery Wiring

The system is not complicated and can be duplicated in other RV brands as well. Your goal in wiring multiple batteries together is to achieve battery balance.
Battery balance is where you try to balance the usable capacity of each battery and help them last longer and be healthier. When you wire the batteries in a straight line you run the risk of not being able to fully charge the last battery in the line.
When you are recharging the batteries, the first battery in line may get full quickly and then signal the charger to stop charging. The way to avoid this problem is to use the external post system described in the previous section.
The way to wire 4 batteries is not to put them in a straight line. Instead, you connect the first two batteries together and then the last two batteries together. That is positive to positive terminals.
Then from the positive on the last battery, you connect another wire to the positive terminal on the second battery. The second battery gets the RV power wire and not the first.
The negative side has you going from negative to negative on the first two batteries and then the second two batteries. Then you connect the negative terminal from the first battery to the negative terminal to the third battery.
The third battery’s negative terminal is connected to the RV’s negative wire. Sounds confusing but it allows you to reach that battery balance objective. It also allows you to charge all the batteries better than taking a chance with an in-line system
Fleetwood RV Battery Hookup Diagram
Here are some diagrams for different numbers of batteries to help provide a visual example of what has already been discussed above.
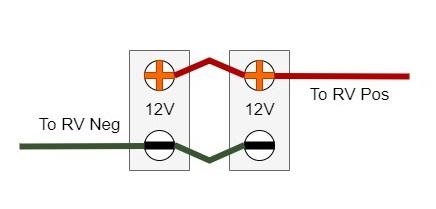
12-volt batteries

3-12-volt batteries

4-12-volt batteries

The external terminal wiring diagram

Connecting 6-volt batteries is going to be slightly different than the 12-volt options. Here are 2 diagrams, one for the 2-6-volt system and one for the 4- 6-volt system:

And

If you do not like working with electricity or do not fully understand how the wires should go, get help from those who know what they are doing and have a lot of experience wiring battery banks together.
Which Battery Terminal To Connect First On RV?

It is always best to attach the power wires last. That way you can avoid any shocks while connecting the negative wires to the negative terminals. Do the negative wires first then the positive wires.
The key is to do this carefully to avoid any sudden surprises or cross-connecting of the terminals. When you are joining the batteries in series, you should connect the negative side first, then the positive side second.
Do that for each battery and then hook the main negative wire up before you hook the main positive wire to the series. Avoiding any electric shocks is essential if you want to enjoy your RV vacation or life.
Watch out that you do not have any electrical systems turned on before you complete the wiring. Keep the load off, like for generators, until the wiring is done.
Some Additional Words
When in doubt, ask an electrician experienced in wiring batteries together. Shorting out your RV due to bad information is never any fun and it may damage some electrical features inside your RV.
Be careful when wiring your batteries together. Pick the best way that will help you recharge and use all the batteries equally. Protecting your batteries is also an essential step when you wire more than one battery inside your RV or trailer.
