
How to Repair RV Siding (Bubbles, Delamination, Bulging)
It is not just dents that cause your RV to look bad and have water leaks. When owning an RV, you have to keep your eye on so many different parts to make sure you are not ruining it as you drive. Non-motor parts can hurt your RV just as much as an engine failure.
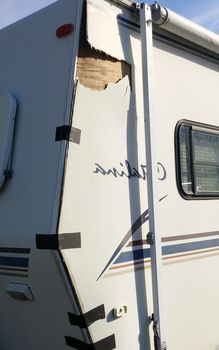
How to Repair RV Siding: When de-lamination takes place, it can be a very difficult fix to make. To repair this problem you usually have to remove the whole side of your RV and replace the bad fiberglass with a complete fiberglass section.
To know how to fix this and other RV issues like bubbling and bulging, just continue to read our article. We do the exploring of each topic so you have your answers quickly. Getting the right advice is important if you want to protect your RV.
Repairing RV Siding 101
How to Fix Damaged RV Siding
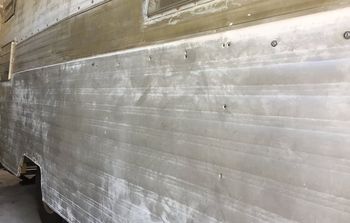
The solution to this problem is to determine or know what kind of siding you have on your RV. The repair work for fiberglass is a lot different than the repair work needed for aluminum.
For aluminum, you can easy remove just one damaged section and replace it with a new one. Repairs are simple and often can be done with only one extra pair of hands. But fiberglass is different.
While you can make small repairs, you usually have to replace the whole side panel of fiberglass to get the problem solved. Small repairs can be done by using a sharp knife and cutting away the damaged fiberglass and repairing the insulation underneath.
Then you just have to use a little auto body filler to repair the hole. Add a little fiberglass over the filler and sand til it is all smooth. After that just paint.
How Thick is RV Siding
The overall answer is that most RV siding sections are not that thick. Aluminum can range between .045 and .056 of an inch thick. Some can go as thin as .030 of an inch thick. It all depend son the type of aluminum siding you want and how it is made.
For fiberglass siding, again depending on who makes it and the style, can be about .045 of an inch thick. That seems to be the industry standard thickness.
How to Fix a Hole in RV Aluminum Siding
Corrosion can cause little holes to appear on your RV. If you delay in patching them, these holes can get bigger and become a real problem. Fixing them is not the difficult. Start with a little sanding to get the rust and corrosion off. Then use a clean, damp cloth and a little liquid soap to clean the edges. Next, apply some metal primer to the exposed edges and let it dry. When it is dry, fill the holes with waterproof caulk. Smooth out the caulk so it looks good and wait for it to dry.
Using a paint brush, put a little acrylic paint on the dried caulk and again, let the paint dry.
RV Aluminum Siding Bulging
Bulging aluminum siding could indicate that the staples, adhesive or screws lost their grip on the frame and have allowed the aluminum siding to loosen up. You may not see the bulge when your RV is parked but it will show up as you drive. Just keep your eye out.
The best way to fix this issue is to go inside your RV and start locating the suds to that section of aluminum. Stud finders usually do not work through aluminum which is why you have to go inside to find those studs.
When you find the correct studs, screw in some stainless steel screws and then pull them out. Fill those holes with silicone and then put the screws back in. This should give you a great water tight seal.
RV Siding Coming Loose
This issue can arise if a seal has cracked or broken. Water has found its way inside to your studs and have worked the staples or screws loose. Whether you have fiberglass or aluminum siding, you are going to have to remove the siding and see if the luan plywood or wood studs are ruined. If so, you will have to replace the wood.
If you are lucky, you won't damage the fiberglass and can reuse it. That will save you a lot of money. If the staples used by the manufacturer comes loose then all you need to do is replace them with good screws. The key to these repairs is of course the condition of the wood underneath.
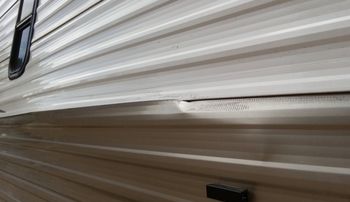
RV Siding Dent Repair
If you can live with the dents or small hail dimples, then you can postpone fixing this issue. But if you can’t or the integrity of the aluminum panel is compromised then you will need to repair the problem.
The only hindrance to this is that it may not be possible to bang out the dents on RV siding. Aluminum is an extremely difficult metal to bang out dents. It is just to easy to re-dent it in the opposite direction.
The only cure for this problem is that you would have to replace the aluminum panel with a new one.
RV Fiberglass Siding Bubbles
The repair of this problem may take a little skill. Once you start getting bubbles in your fiberglass you need to work carefully and sand down the bubble till you get to solid fiberglass.
Next, you have to use fiberglass cloth and resin putty (gel coat or epoxy) until you get the spot back to level. Then paint to match. But if the bubbles are caused by de-lamination, then you may have a more difficult repair to make.
You will have to cut out all the fiberglass, then remove the damaged foam. After that, you need to check the integrity of the plywood backing. If it is fine, then you just put new foam inside, using epoxy putty to secure it in place. Then add a little filler before putting new fiberglass on.
A little sanding and painting should cover the problem.
RV Fiberglass Siding Maintenance
To maintain your fiberglass siding on your RV you may only have to worry about looking after the gel coat layer. Over time gel coating can become old, it yellows, becomes cloudy or foggy and it is all due to oxidation.
To ix your gel coat issue, you will need to get some gel coat restoration products. Most likely you will see the words marine use on these products you can use them on your RV. Some will say both marine and RV use. Either way, you can maintain your RV fiberglass siding.
To remove the yellowing gel coat, all you have to do is a little buffing. Then you add the new coating and work it in while it is still wet. All of this is done by hand. After you have worked it in, polish the area and then wipe off any excess.
Or you can use a power buffer and save energy and strain on your hands.
RV Filon Siding Repair
Dealers may want to charge a lot to fix your damaged filon siding. One RV user was faced with a $2000 charge for a small hole. You can fix it yourself and save a lot of money. Filon fiberglass usually comes in rolls and can be cut to different sizes from 1 to 40 feet in length.
The rolls are usually a standard 8 1/2 feet wide. Once you get the amount of filon you need, you just cut it to size and glue it over the hole. Adding a nice picture will cover the bad spots and keep the repair hidden.
Your fix may be a bit different but other than stripping off all the siding and replacing it with new, you are left with few repair options.
RV Siding Delamination Repair
Simply put de-lamination occurs when the bonding agent holding the fiberglass siding to its backing is damaged and it lets go of its hold. This damage can occur through water leaks or hard impacts. This situation may not be noticeable right away.
One method of fixing this damage can be through using a de-lamination kit. These kits can cost between $200 and $300. The syringes inside can put new bonding agent inside and help the fiberglass to re-adhere to the backing.
You will have to check for cracked or lost sealant , then repair that before you are finished with your repair. This is not a situation that you can let go and wait to fix. De-lamination does a lot of damage to your frame and your RV in general.
If the problem can’t be solved with a kit, you may have to do extensive repairs to the backing and frame. Read more about RV delamination repair cost.
Best Adhesive for RV Siding
Making repairs to your RV siding depends a lot on the type of adhesive you use. For fiberglass one adhesive would be Polyurathame. It can be found in the caulking section of your favorite box store or hardware outlet.
The best adhesive to use are those that do not have any petroleum or solvent ingredient sin them. These ingredients eat away at the foam insulation and backing behind your fiberglass siding.
When this happens you are opening yourself and your RV up to de-lamination issues. Take the time to read the ingredients on the label before purchasing. Don’t assume or take just anyone’s word for it. Avoid those adhesive with those ingredients that harm your foam insulation.
RV Siding Repair Tape
For most people duct tape is their go to problem solver if something breaks or there is a leak. It does a good job on RVs temporarily. Of course, duct tape does not always look good on the side of your RV.
There are special sealing tapes made just for RVs. These tapes can seal up water leaks, cracks and they are a permanent fix. The tape is called Eternabond and you can find a variety of lengths and styles at this website.
There are double and single sided varieties to help you fix just about any problem quickly. Plus, these tapes do not take up a lot of storage room. They are lightweight and can easily be placed in a corner or drawer until it is needed.
There are other tapes, like putty and leak repair tape but their price may be a bit high for some RV users. Check with your local RV parts store to find some good tape alternatives to these options.
RV Siding Patch
Generally, when you need a patch to your your RV siding, it is easier to just replace that damaged section if your siding is aluminum. There is probably less work in replacing the damaged section than there is trying to repair it.
There is one way to repair a dent in your aluminum before replacing the damaged panel. All you need to do is drill a small 1/8 inch hole and then place a washer over a self tapping screw.
Insert the screw but not all the way. When the screw has a good hold on the aluminum, grab the washer with a pair of pliers and pull. The dent should pop out. Just do not apply too much pressure. If you do, you run the risk of pulling the aluminum out further than you want it to be and you are left with another problem.
Some Final Comments
Repairing your RV siding has a lot of twists and turns. A lot of repairs will depend on the size of the damage, where it is and what material your siding is made of. The important issue to remember is that most of the damage done to your RV cannot wait for very long.
The longer you wait the more damage you may cause. It is best that you address these issues as quickly as you can as you could be hurting your RV’s frame and other important parts.
Spot checks, preventive maintenance are two ways to ensure that the damage does not go unnoticed. Sometimes you may have to look closely as the damage may not appear when you are parked.
