Why Is My Dometic RV Toilet Water Valve Leaking? (How To Fix)
Not every RV repair is going to be a major job. Sometimes they are going to be minor. What makes them a hassle is they are often in an out-of-the-way spot that is very difficult to access. If you are under warranty, the wait for a time slot makes it more frustrating.
When it comes to toilets and sinks, RV makers like to cut corners. They often do not include water shut-off valves in the water supply lines. Installing your own shut-off valve is the way to go. It may take some work but it is better than waiting for warranty service.
To learn more about this topic, just continue to read our article. It has the information you want to know about so you can make a good repair and not have your RV or trailer sit at the dealer’s for weeks on end for a minor repair.
Why is My Dometic Toilet Valve Leaking?

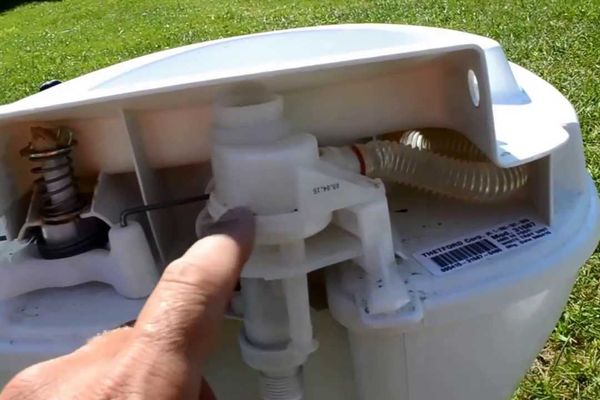
There can be several reasons why this problem has surfaced in your RV or trailer. One reason would be that the hose clamp has loosened off a bit. When it does, water will find its way out of the hose and onto your floor.
Just tighten the clamp to see if this solves the problem. If not then check the connector. There will be times when the O-ring will fail and let water out. If that O-ring is replaceable, then just get a new one and do that fix.
The worst-case scenario would be that the water valve is bad and cannot be removed or replaced. There are RVs and trailers that have the valve as part of the toilet assembly and that is not going to be good news for you.
When the toilet water valve is part of the toilet, and it will say so in the owner's manual, then you have to replace the whole toilet. This is never a fun task nor an inexpensive one.
If the leak is at the water inlet portion of the valve, then you may have to install a shut-off valve. This requires a few parts to make sure the PEX pipe will fit onto that valve.
The RV Toilet Inlet Valve Leaking

This is a problem we barely mentioned in the previous section. This can be a common problem as RV makers do cut corners. The materials used to attach the inlet water pipe to the toilet are not always made from the best materials.
The problem with this issue is that there is not enough room to work in. You may have to do what one owner did and replace the PEX line with a longer pipe but not too much longer.
The Home Improvement stores do sell short lines and then you would need to buy some stainless steel hose clamps, a PEX crimping tool, a shut-off valve, and a crimp removal tool.
You may have to remove the toilet bolts to get some extra room to maneuver especially to make the new hose and valve fit properly. Make sure to have the right thread tape or putty to handle any thread leak issues as well.
Once you have got everything in place, just put the toilet back in its spot. It takes a little work and if you are not under warranty, this may be your best solution. It seems that on some models of RVs and trailers, there are no independent water shut-off valves.
You just have the one for the whole unit and if you shut the water off, then no one can use it. Installing independent shut-off valves is a great way to keep the water running to other parts of your RV, etc., while you do this work.
How do I Fix a Leaking Toilet Inlet Valve?

The materials you need are listed in the previous section, at least if your RV or trailer has a PEX piping system inside. The materials you will need will depend on several factors.
One of those factors is what pipe material was used to create the inlet to your toilet. Unless you are changing the entire pipe, you may have to stick with the materials already installed.
You can fix the inlet valve in the same manner that the RV maker constructed it but that may just be delaying the inevitable. Adding a shut-off valve to your major water inlet lines is always a good idea.
It is a little more expensive and it takes a little more time to do but it is worth it when everyone else can still use the water while you are working. To do the actual work, you have to have the tools to match the materials.
Box cutters work on plastic materials but you will need the right type of screwdriver. Just remove the pipe and use the clamps to install the new one. If you have room for a shutoff valve, then you will need to put that in the middle of the line.
Make sure to tighten those clamps so the water does not leak out of any connections. The pipe should slide right over the valve connections and you won’t have to worry about using plumber’s tape or putty.
Once you have tightened those clamps, the work should be done. Do a test to make sure before you put the toilet back in place.
Some Final Words
It is said that getting warranty work done for minor repairs is a big hassle. You may be able to do this type of work and still not void your warranty. It will be your call as doing it yourself is a lot faster than waiting for the dealer to free up some time.
This is standard plumbing work so it is all straight forward and there are no real surprises that will interfere with or delay the work. Time and a little skill are all you need.

